Tuesday, November 20, 2012

It's about time

Happy weaving hands
It's been far too long since my last post.....5 months to be exact. Not that I haven't thought about posting every week and I have multiple topics to share....but it has been a particularly busy fall for me. I've been working in schools from Connecticut to Maine.

Wise words from a young heart
So here it is November, and it is about time that I stopped procrastinating! I'll include some images from my work in schools not just because this is what keeps me from blogging, but this is what keeps me young and inspired.

This is also a season for gratitude.  As a sales person for Macomber Looms I pride myself in honest, speedy and personal attention to my customers. I do my best to answer your questions and trouble shoot your loom or weaving problems. I also enjoy distance teaching a few of you. So here is my hearty thanks for all your support and business over the past year.

Many of my past blog posts have been about maintenance tips or revealing how parts of the Macomber Loom work.  This post I'd like to share with you how to properly advance and wind your warp so as to avoid the "Bad Dog Syndrome".

"Seasons of Joy" Weston, MA Completed October 2012
This little discussed syndrome came to my attention this past year when a few weavers called in to replace a worn out dog on their warp beams. One of these replacements was for a relatively new loom (2 years old). I also saw this syndrome on looms up at Haystack when I was there to repair looms this spring.

Worn out and tired dog.
The symptoms of "Bad Dog Syndrome" are simple: a dog that is so worn down that it will not engage with the ratchet brake. This will make the ratchet brake slip and not hold your warp under high tension.Here's a photo of  "Bad Dog".

Here's how the most common way to get "Bad Dog Syndrome"
  • Winding a warp with the ratchet brake engaged.
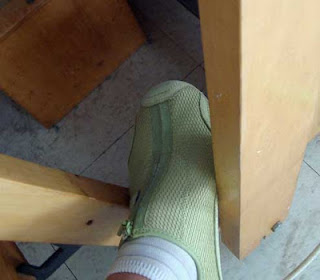
Here's the best way to prevent "Bad Dog Syndrome"
Foot on front brake release pedal while winding warp.
  •  When winding on a new warp, stand at the side of the loom. 
  •  Place your right hand on the crank handle which is on the ratchet brake on the warp beam. Hold the warp beam in place with a bit of pressure.
  • Place your left foot on the front brake by slipping it between the beater and the castle.
  • Disengage the brake at the font, while maintaining pressure on the crank to keep the warp from slipping backwards.
  • Now wind the warp to the back beam.
  • When you are ready to comb out your warp, re-engage the brake. 
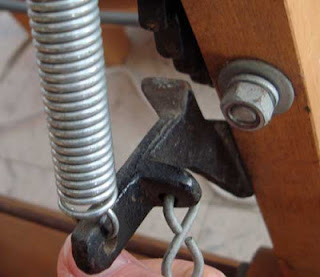
Basically what you need to do is wind on the warp without letting the dog go click..click with the ratchet brake. Winding the warp with the dog engaged with the ratchet is what wears down the dog and creates "Bad Dog Syndrome".
 "Good dog" is disengaged while winding warp.

Although many of you might assume that having the dog engaged while winding the warp is a good safety measure, the health of your equipment says otherwise!
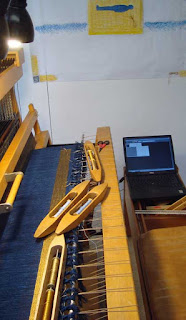
New woven art piece November 2012
I have plenty more topics to share, but time has run out...it's time to weave! Here is an image what I am working on now.

In closing here's a little thought from Wilferd Peterson:
 "When we become more fully aware that our success is due in large measure to the loyalty, helpfulness and encouragement we have received from others, our desire grows to pass on similar gifts. Gratitude spurs us on to prove ourselves worthy of what others have done for us. The spirit of gratitude is an energizer."

With gratitude and appreciation to each of you ~
Sarah

Sunday, July 15, 2012

It's official! New price list!

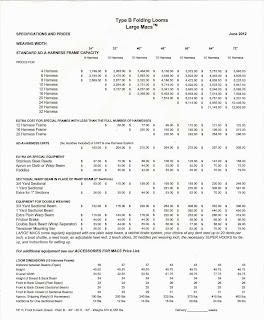
The folks at Macomber Looms have just released a new price list with a 10% raise in loom prices as well as some loom parts. It's been 8 years since the last price hike, so I suspect no one will complain! I have embedded the price list here as well as put it on the side bar as a larger file.

Thanks to everyone for all you business, your kind words about my blog and most of all for your companionship in this weaving world!

Eddie and Linda Hart will be attending Convergence out in Long Beach this coming week. Macomber Looms will have a vendor booth after years of being absent. I suspect that many weavers will be quite happy to see these looms in person and to meet the famous Eddie! Please be sure to use my name if you order a loom and let me know!

As noted in my previous blog posting, I was away all last week teaching at a campground in Searsport ME. At the end of the week, I visited the accident site where my dear brother Weston was killed last August. The prayer flags that have been hanging just shy of a year are beautifully weathered by the sun, wind, rain and snow.

Happy weaving to each of you. May the warp and weft of your days reveal life's truths to you. Namaste ~ Sarah
Prayer flags

Thursday, July 12, 2012

Since you asked....

     Every so often I get a request for a description of a particular part that has not yet been in a post.
Casters in lowered position, or moving position.
This week a weaver wrote asking about the casters for a B Model loom. She is in the process of redecorating and needs to move her loom around; mind you this loom is a 48" 16H B4 loom, not an easy thing to just slide around your house! So after a few emails back and forth with my verbal description, I decided that a photo of the casters would speak many words of description.
Eddi shows how to flip the casters up and out of the way.
     I headed over to the Macomber shop where Eddie is trying to get ready for Convergence. He kindly found a pair of the casters and we faked a set up to illustrate how they sit on the bottom foot of the castle.
Casters in the upper position, or stable position.
    The casters are bolted to the bottom foot of the castle of your B Model Macomber. When you want to move the loom, you flip the casters down and slide the loom around.
    I hope that this little photo series helps illustrate how there simple casters can help you move a behemoth loom with ease. A pair costs $99, cheaper than hiring "Joe the mover" to come over and assist you!
Artist studio at Searsport Shores
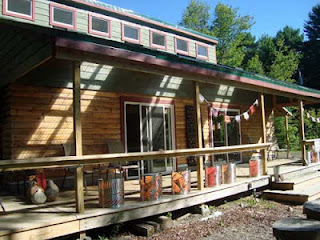
    It is summer here in Maine, a time we wait and pine for all year. Short, sweet, fast and fun. I am just back home from a one week Artist in Residence at the Searsport Shores Campground. This amazing campground, right on the ocean's edge, has a studio for a resident artist, a different one for each week of the summer. And in the fall they host the Fiber College. 
    While I was there I worked with all ages of visitors doing a wide variety of projects. You can learn more by visiting my website blog.
Weavers of all ages playing with yarns and patterns.
     Thanks for asking about the casters Trudy! Hope this explains how they work. Happy summer and happy weaving to each of you!
Sarah


Friday, June 15, 2012

Hoist, scrape, dust, mend, then breathe and weave

The rocky coast of Deer Isle Maine
Lesley scrapes off masking tape.
     In late May I went up to Haystack Mt. School of Crafts to volunteer for their annual spring clean up and studio maintenance. I was happily assigned to the Textile studio. When I was asked if I would mind going through the looms and see what needed repairs, I replied "Are you kidding?" I jumped right in and was even given a few comrades to help with the moving and cleaning of the looms.

     Now mind you, these loom see far less action than they did when I first attended Haystack in the 1970s. The Textile studio now is used for all sorts of surface design and textile arts. So these looms get used maybe once a season. And over the years they have been rather neglected. As with many communal studio spaces the equipment does not get the TLC one would give their own loom. So these looms had YEARS of crusty masking tape gummed up all over them. That was our first task, to remove the tape.

     We discovered that Silicone spray on the old tape would work really well to help loosen up the stuff. Then using a scraper we could usually easily remove most of the old tape.
     Please remember to REMOVE all the tape whenever you put it on your loom!! Your loom will love you back for this effort.
Silicone spray helps loosen old tape
Many hands make light work, thanks team!


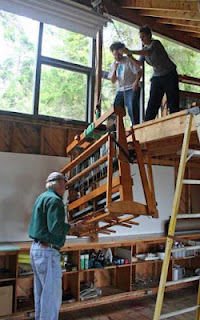
Hoisting the looms down from the loft
Over the period of two days we scraped and cleaned, washed and dusted over 15 Macomber Looms. A few years back Haystack Mt. School made the wise decision to convert the weaving equipment to all one loom brand. This makes it easier to teach weaving and maintain the equipment. So with the help of a few of wonderful friends, we made light work of a long over due task.

Now because the Textile studio is used for many other techniques besides weaving, about ten of the looms are stored in a loft. Here's how we got them up and down! No easy task!

Misty evening on Haystack shores.

Yes, the color of the water is really this green!
Next week, I will head back up to Deer Isle to bring the parts that many of these looms need to be brought up to working order, including ten beams that needed new aprons strings! My dear husband Ben and I will spend another two days working to install beams and other parts. I look forward to breathing in the salty air and resting awhile down on the granite shores.

Sarah at Sunapee NH Crafts fair
     Now most of you know that I have been at this business of weaving for a very long time. So when I was at the Macomber shop last week, the guys handed me this photo, taken in 1983(?). I hope you get a good laugh at the glasses, hair and the skirt. I know I did! Here also is the first page of an article written about that photo. A healthy sense of humor about one's self is very important as we travel along this road of life!


Computing Magazine article


On a final note, I get many calls from people that are re-habbing old Macomber Looms. Most folks want the short cut version of what to do. So here you go:


MACOMBER LOOM REHAB AND BASIC MAINTENANCE LIST:
  • Clean all the wood with Murphy's Oil soap
  • If any of the wood is "raw" apply a light urethane to seal it
  • Vaseline all connections between bronze and steel (jacks, etc)
  • Spray metal parts with silicone spray (Heddle bars, etc) (NEVER use WD30 or 3 in 1 oil!!)
  • Spray lamms and guides with silicone spray
  • If cast iron parts are rusty, use Rustoleum paint
That's the important stuff. Thanks to everyone for your comments and photos of your looms. Happy weaving!

Wednesday, May 9, 2012

"I never thought it could be so fun"

The thank you letter
I've been spring cleaning, and I mean a massive studio cleanse. I have been heaving out piles of yarn, drawings, layouts for tapestries, mat board, slides, assorted weaving materials, notebooks and computer parts. Amidst all these cast offs, I unearth at least one treasure a day. Yesterday, I found a folder full of letters from a school where I had been an artist in residence. This letter is a real gem.....my favorite part reads: "I never thought it (weaving) could be so fun. I thought it was only a old lady woman thing. Thank you for teching us to weve."
samplers from over 25 years ago
samplers from at least 20 years ago
Well, there you have it. "An old lady woman thing". Stereotypes abound, but never mind, even if I am getting older and I am a woman, weaving (or rather weveing) still fills my day, lifts my spirits and challenges my brain.

sampler from over 30 years ago
Among the stuff I sorted through yesterday, I found decades of samplers. Now as a weaving instructor I am always in favor of sampling a weave structure and the materials before launching into a full blown project. But Good Lord, now I have decades of samplers filling boxes, baskets and bins. I always advocate to my students to never throw these out. I still believe that as these are a record of your research, your successes and your failures. There might be a few here and there to toss, but for the most part, roll them back up and store them as you would any good resource materials.

part of a bed covering that I never completed, 35 yrs old
As someone who has been weaving for over 40 years, there is much to review in these bins stored up high in my studio loft. Each bin reveals memories, treasures and yes...trash! Or perhaps something to pass along to other weavers.

Things at the Macomber shop proceed along. Thanks to everyone for their kind thoughts about Rick and the Macomber family. Thanks to everyone for ordering your looms and parts from me. Although it is possible to call the shop directly and do the same, I believe that I offer a weaver's wisdom and knowledge, at no extra cost to you. So I want you to know I truly appreciate your business.

Speaking of business, I have a new one! I am now an official sales person for Gowdey Reed. I have started a blog just like this one where you can learn about reeds and heddles. Check out my new blog ~ Gowdey Reed, heddles and handweaving.

I promise that in my next post, I put up some more tips about our beloved Macomber Looms.

Thanks again to all ~ Sarah

Thursday, March 1, 2012

A history lesson

 56" 4H fly shuttle
Yesterday someone posted this question to the blog: "Hi Sarah, I love my Macomber loom, B5 1223 the metal plate reads Saugus, Mass and not York, Maine, what is the history behind the two locations"

Well this calls for a brief history lesson! I am actually going to quote an old newspaper interview with Rick Hart. This article was printed in the York Coast County Star on June 13,1979.

It is with a few smiles and chuckles that Rick traces the family business back to 1934 in Massachusetts when Cousin Della who was a well known weaving teacher in the Boston area and Uncle Leroy (Macomber) an engineer for General Electric teamed up to design a loom. 
R 10 1950 12H 56"
"She was trying to build looms on her own and not being very successful" said Rick. The partnership broke down in 1936, however, when Cousin Della and Uncle Leroy could not agree on the design. The Hart family still has a file of correspondence between the two. "It's interesting to see how it developed" said Rick.
     Notwithstanding the disagreement, there are no hard feelings, Cousin Della, now in her 80s, distributes parts for looms from Boston and receives mail for Macomber Looms. After the split, Macomber proceeded to open a small loom factory in his basement in Saugus. He worked with a few helpers three nights a week and on Saturdays producing a then one-of-a-kind 24 harness loom and making looms so that extra harnesses could be added on when the weaver became ore experienced or wanted to try something different.
      Fred Hart (Rick's father) joined his Uncle in 1945 and Rick joined the operation which had become more of a full time business in 1962 when he was only 14 years old. He worked afternoons and Saturdays and vacations for the company which had by then moved to two floors over a gas station in Saugus. Leroy Macomber passed away 1967 and the Harts bought the business after their aunt had run it in the interim.
    But Rick Hart yearned for the country life, so Macomber Looms moved from Saugus, Mass. to York in July 1977.
1950 R10 12H 56"
 So there you have it....the reason some looms were built in Saugus and some were built (and still are) in York.

Look as this: #1!
Look at these odd jack levers.
Number #1 Model B
Ironically right now in the shop there is the #1 Macomber Model B loom! This loom is in for a total make-over. The jacks are rather odd. But with some investigation Eddie found out why: the old harnesses were made of wood and this system allowed for adjustments.

Basically this loom looks the same as they are currently made, but the wood is quite dark.
So there you have it...a brief history of Macomber Looms.

Thanks for asking Erin!

Happy weaving! Sarah

Wednesday, January 25, 2012

Rick Hart

Sunday evening Rick Hart, owner of Macomber Looms passed away at his home. He was 63 years old. You can read his obituary in the local paper.  Our sincere condolences are extended to the Hart family. Eddie is keeping the shop running, so no worries about getting any orders you may have placed recently.

I am LONG over due with an newsy update. Holidays, family, travel and work have kept me busy.  So hang tight, keep weaving and calling me with your orders. I'll be back with photos and loom info soon. Thanks to everyone for your Manual orders!

A tip of the hat, or rather shuttle, to Rick for his many contributions to making Macomber Looms the loom of choice for generations of weavers.
~ Sarah

24" 8 Harness CPJ Macomber for sale

  24" 8 Harness Macomber CPJ Portable Loom for sale. Double back beams with friction brake and warp separator. 4 reeds, storage box, 2 ...