Monday, December 16, 2013

Powering up, moving on and New Years ahead!

First big snow of winter 2013!
I LOVE snow days. Days when I can sleep in, putter around the house or studio, hunker down and feel no need or urge to go anywhere. Today was just such a day, our first big snow fall of the winter. We received about 10" of fluffy white snow that coated the back bone of the trees, highlighting every vertical and horizontal edge with a white stripe.

The appliqued prayer flags that I put in my front yard last July look amazing against this white backdrop.
colorful flags contrast with white snow
I have many news bits and updates to share with you, so settle in for a good read and many photos. When I title a blog, I try to give a hint to what's coming. In this post I will cover ~
  • Some tips and tools for moving looms
  • A new power supply for those of us who are electronic
  • A warping tip as seen on my CP recently
  • Looking ahead to 2014

Moving Day 

Since so many of you purchase used looms and face the seemingly monumental task of transporting your new/used loom across country, I thought a blog posting on this topic was in order. I consulted Eddie at the shop who crates and ships looms every week. First tip - I advise that you ask the seller not to take anything apart on the loom. It is helpful to see the loom set up before you take it apart to move it. Here is a list of helpful tools/supplies for moving your loom:
Some of the things you will need to move a loom...plus big muscles!
  • Camera to document what the loom looks like all set up. Also document how you took things apart.
  • Old blankets, towels for padding
  • Zip lock bags for small parts, marker to label the bags.
  • Small screw driver for the collars on the treadle rod. Some of these collars require an Allen stye wrench. So you might be smart to bring a small Allen wrench kit.
  • Fiberglass packing tape, blue painters tape (the kind that won't ruin wood).
  • Rope or heavy cord.
  • Silicone spray.
  • Card Board and craft paper.
  • Hammer and small metal rod.
Loom all crated and ready to ship.
It's wonderful if  you do not have to take apart the loom, but I realize that is not ideal for most folks. Common sense will guide most of your packing steps. The general idea is to tie down any loose parts. Tie the beater in place. Wrap the harnesses with craft paper or cardboard and then use the fiberglass tape to secure them. Look at this photo of how Eddie wraps the harnesses.
Loom all secured for travel.

Loosen collar that holds treadle bar in place.
If you must take apart the loom here are some things you can do to reduce the size/weight:
  • Remove the beater.
  • Remove the beams, front/cloth beam and back/warp beams. remember to bag and label the brake parts. 
  • Remove the treadles by taping out the rod that holds them in place. Before you tap out the rod, loosen the small collar that holds them in place. Use a hammer and a similar size metal rod to tap.
  • Use Silicone spray if tapping out the rod is challenging. 
    Tapping out the treadle rod.
  • You can also remove the back beam at this rod if you want to.
  • To remove the front breast beam you will need a 3/8" wrench to undo the bolt.
  • The harnesses represent a lot of weight. So removing them is a good idea. But please understand that without the weight of the harnesses, the lamms, side wires and jacks are at risk of damage and bending. So you MUST secure the jacks in place prior to removing the harnesses.
  • The best method to secure the jacks is to use Fiberglass tape and some craft paper or cardboard. Wrap the paper/car board around the cross pices of the castle to secure the jacks in pace. Wrap tightly with the tape. This should be done very tightly so that the jacks will remain in place once the harnesses are removed. Unfortunately I do not have a photo of this. I'd love to have one if anyone does this!
  • Once the jacks are secure you can remove the harnesses by slipping them off the chains. Be sure to bag up any chains and S hooks that are loose.
  • The rest of the loom is glued together. I recommend NEVER taking apart glued joints. 
These steps will give you a striped down castle and something that you should be able to maneuver into most homes/apartments. At the bottom of the price list you will find weight and dimensions of many of the looms.

I would LOVE to get photos of your looms in transit, plus any tips/comments on this topic! Happy moving day! When I as in art school, my (now) husband and I moved 9 times in a year, our theme song was Moving Day by the Holy Modle Rounders. We got pretty good at moving looms!

Powering Up  

 About a year ago, the manufacturer for the power supply/loom control for all Macomber compu-dobby looms retired. I was dismayed...until John Acord appeared on the scene! John is a weaver and all round wizard with support for compu-dobby looms.
Flatwater Electronics power supply and loom control
I am now very happy to announce that John has developed and is ready to sell a power supply that will interface with all Macomber electronics. Especially for those of you who have the out dated Designer's Delight, this will be great news.
Here's what John says  "A replacement control and power unit for the Air-dobby is now available. Two versions are available. 16-shaft and 32-shaft. Coming soon will be the version for the Electroinc Single Pedal. (electro-mechanical solenoid drive).
The new control box utilizes modern efficient components and power supply, significantly reducing the size. The box is not much bigger than a CD case.
Incorporated into the control are protection circuits to prevent damage to your loom in the case of solenoid failure or problems with wiring and connections.  In addition, indicator lamps on the front help the weaver confirm operations of boththe loom and computer."
For more information visit Flatwater Electronics. 


 Threading the reed

I have described to a few of you how I set you the reed in a horizontal fashion to thread it. I do this for two reasons - it is better for my posture/back and it is all round easier to see and thread. I support the reed on two long lease sticks that run front to back on the loom. From this position it is easy to see the ends to thread and the reed slot that you are aiming for. I use a similar set up for my B model loom.
Threading the reed on a CP.


56" ready to be dressed in blues!


 Looking ahead to 2014

Our Maine winter has not officially begun (Dec 21st), but I will tell you in is VERY cold, snowy and great time to be inside weaving!
I am also dreaming about my trip to India in January. I will be away from January 11 to February 10th. I'm not sure what kind of Internet access I will have, but if I can I will post some photos and stories. Rest assured I will have much to share upon my return. If you are interested in ordering parts or looms, please contact Eddie at the shop. 207-363-2808 If you mention my name, I will happily receive credit for your purchase! Thanks!! If you order a loom through me I will give you a free copy of my Macomber Looms Manual!

As 2013 draws to a close, I find much to be grateful for, including each of you dear weavers. You are a special bunch, who deeply care about each other, willingly share information and support the best in each other. 

Thanks for all your business this year. I am always happy to help you!
May the love and peace of the season light up your heart and home.
Namaste ~ Hindu for I honor the light in you ~ Sarah


Friday, October 11, 2013

Repeat the lesson

Repetition has been a foundation of my life and a cornerstone of my work for decades. Repeating an activity (physical or mental) allows me to get better at it, to work towards perfecting it, to revisit it from an new angle.

Thread by thread.
Repetition is part and parcel in the territory of weaving. One of my mottoes is "thread by thread"...by thread, by thread, by thread. You get the idea.... by repeating threads I create/build a better weaving.

I also love a daily practice which for me is the repetition of a morning routine. I try to get up at the same time every day. I feed to dog, let her out/in, make tea, then meditate and do some yoga for an hour. This morning pattern sets up a grounding for my day. With the repetition of some form of daily exercise I keep my body healthy. So through repetition, I gain strength, skill and insight.

My trusty tool, my right hand.
But with all good things, there is a dark side. Repetition does have draw backs. As some of you may have read in a past blog,  I had a disc problem in my back about 23 years ago from the repetitive motion of weaving.   Last week, after years of symptoms, I had surgery on my right hand for carpal tunnel syndrome, mostly likely caused by the repetitive motion of spinning, weaving, knitting, stitching, gardening. The good news is that I am healthy, will heal quickly and the surgery has a 90% success rate. So before long I'll be back to all my old repetitive habits, but with new insight and no pain or numbness!
An old sign found in the Macomber shop recently.

The title of this post is "Repeat the Lesson"...which is to say, that like many creatures, I need to revisit old lessons. Lessons from the loom, lessons from the yoga mat and lessons from Mother Nature.The lesson here is that here is that my hands are a valuable tool. They can work hard, but I need to be aware of the potential for over work, for wear and tear. And ....that they can heal, renew and be good for many more years of faithful service. Thank you hands.

Meanwhile, at the Macomber shop, Eddie has been building looms for well over 35 years. His hands are well worn, missing part of one digit and physical evidence of his repeated good work. I stopped by the shop today, got a big bear hug from him and news that all is well with his loom building hands!

 I hope that all you weavers out there take good care of yourselves. As someone who has been weaving for over 40 years, I can attest that this profession can take its toll on one's body. But I can also attest that with respect and care, one's physical body can be of good service to our passion for decades and decades.

Happy weaving my friends ~ Sarah

Monday, June 24, 2013

Name that part!

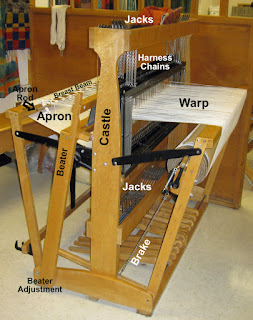
With the help of two generous weavers I finally have good images of  the loom with many parts labeled. Thanks to Sue Jensen and Morgan Clifford for assisting in this effort! These images are now part of my PDF Manual. And here they are for you too!
Enjoy ~ Sarah

CP from the front

CP side view
CP treadle detail

CP cloth beam brake system

B Model back view

B Model side view

Measuring up

What a LONG winter/spring it has been! I have had an extremely busy season with lots of fantastic opportunities to teach weaving to all ages and abilities. My oldest student this year was 102! Here is a photo of her weaving, notice the careful pattern and symmetry.  She carefully cut each piece of weft and wove it in place. Simply inspiring! I'll include a couple of other photos, just 'cause I am so proud of the hard work my weaving friends have done! I'll be posting more photos on my own website soon!

At the Macomber shop Eddie has been SUPER busy working on all your looms and parts orders. But he always seems to have time to answer your questions that have me stumped. Recently I had his help in unraveling the mystery of tie up hooks and all the various sizes.

Here are the 5 sizes of different tie up hooks with labels and on a ruled cutting pad. I hope this helps unravel the mystery. Basically the Regular size hooks only come in 2 sizes - CP and B model. The newer Super hooks have 3 sizes - CP, B4 and B5. It is important that you use the correct hook for your loom....it really does make a difference in your shed.

3 sizes/Super hooks, 2 sizes/regular hooks
20" 10 H CP with blocks on outer treadles
 I learned something new this month. A weaver contacted me with a question about the small blocks that were on her 20" CP. On the outer right and left treadles there are thes small blocks of wood.You can see them here. So the reason that the 10H 20" CP has thees blocks is that the treadles on the outer edges are too close to the loom frame to use easily. Eddie says they have no other function and so you can remove them if you like. Thanks Gay for this great question!

And finally I have some great images of looms with with parts labeled, so those of you who want to know the terms for your loom parts will have something to study! Thanks Sue Jensen and Morgan Clifford for all your help! I will create a whole separate post so that these images get the spotlight they deserve.

And lastly I want to remind you that YES.....the eye of the heddle is lower than the front/back beams. This design feature creates the amazing shed that Macomber Looms are known for.
Note how warp dips down in loom center.

"Good Grief" Mandala Morristown, NJ

Happy weaving to all of you ~ Sarah

Thursday, March 7, 2013

Bigger Questions

Words of wisdom from a 9 year old.
March is certainly roaring in like a lion today...snow swirling around, 40 MPH winds, grey skies and a penetrating dampness has seeped into my bones. Let's hope that March stays true to character, mellows out and leaves like a lamb!

Three Mandalas woven at Harvard MA Elementary
Last month I was artist in residence in two New England schools. In one of them I worked with 2nd, 3rd and 4th graders to create three amazing Community Mandalas. In addition to the weaving, they made clothes pin people that represent different aspects of MA history (Shakers, early settlers, immigrants, explorers). These will be added at a later time to the completed Mandalas.They also wrote inspirational words on ribbons that will hang down from the Mandala like fringe. The three completed Mandalas will be presented to the Harvard, MA community on March 22nd at the school's "Festival of Cultures."

I offer these images and thoughts to you my fellow weavers because whenever I work with students, young or old, I learn more about myself and my relationship to the larger world. Weaving has always been my medicine, the practice that heals, affirms, balances and grounds my spirit, my heart and my body. The more I work with others, I understand that I am not unusual. Weaving is healing.

Here is a beautiful Navajo inspired poem that supports my feelings:


The loom, my child
is life itself.
The weaving-way holds beauty.

The loom, my child
is breath itself.
The weaving-way holds power.

Through weaving one can come to know
the meaning of life and breath.

Through weaving one can come to be
 strong and self sufficient.

Return to your loom.
Resume your work.
Spin your web of wool.
And as you weave
and as you work,
Life's truths will come to you.

 Navajo poem from Halo of the Sun, by Noel Bennett

Crated and ready to go.
I close with an image from the Macomber shop of a loom all crated up and ready to be shipped to its new home. To me this photo is full of potential and anticipation.

May each day hold for you a crate full of potential, the possibility of discovery and joy.

"Return to your loom.  Resume your work.
And as you weave may Life's truths come to you."

 Please note that I will be away from March 8 - 15th on a silent meditation retreat .  I will respond to email and phone messages upon my return. 

Namaste and happy, healing weaving ~ Sarah 

Tuesday, January 1, 2013

Happy New Year!


Trying to make friends with a snake, India 2008.
Happy 2013 ~ The year of the snake! I'll admit it, I am not a big fan of snakes. But when I traveled to India in 2008, there is the ever-present tourist opportunity to get your photo taken with a boa. Do I look slightly awkward? I cannot recall my exact thoughts, but I do recall trying to be "relaxed". 2013 is the Chinese year of the snake, and I will do my best to bravely step in to this new year, to face  obstacles with a smile and strive for a balanced attitude in the face of the often slippery, non-linear direction of the snake.

a page from my journal
I begin this New Year with working off-loom finishing a piece that has been in the works for months. I started with a drawing back in June, was able to weave this image in November and removed it from the loom about two weeks ago.

Weaving towards the end of the warp
Now I am working on tying the knots for the lower fringe, sewing in all the ends on the back.The finished piece is 48" wide by about 36" tall. It is woven with indigo dyed lined, rayon and metallic threads. I'll post images when it is all sewn and ready to hang.

Work in progress. Note lap top for my air dobby.
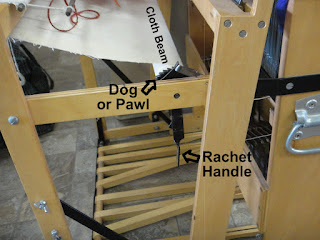
Correct position for the cloth beam ratchet brake.
Over the past couple of months I have had several requests for images and info for the CP front brake system. The dog, the wire spring and the ratchet are parts that often do not hold up over the long (up to 40 years!) life of the CP loom.

Notice in this photo that the wire spring is holding the dog in place on the ratchet. I hope this helps!

Gently squeeze top of super hook
Another question I often get is about the tie-up hooks: how to make them stay on the lamms, especially the old style lamms. Over time the top crook on the super hooks will get opened. I suggest that you give this top crook a gentle squeeze with a pair of pliers. This will make the hook grab the lamm more tightly.

Tap the super hook up to release it from the lamm.
Then when you need to remove the super hook to change the tie up, you might need to use a gentle tap with a small hammer to release it. This method should help with any pesky loose tie-up hooks, either on old style or newer lamms.

Anti-backlash cord with overly stretched spring!

CP cloth advance handle, upper one is very bent, lower one is perfect.
Lastly, often when I am over at the shop, Eddie shows me parts that he is repairing or replacing for customers. He gets a big kick out of some of these well loved parts. Here are two from this fall.

So here is a hearty wish to all of you for a peaceful, healthy 2013. Thank you for your kind words, your orders for parts and looms. Please be sure to visit my other blog ~ Gowdey Reed and my website.

May the snake inspire you to travel in creative directions, not always following a straight path.

Namaste, Sarah

24" 8 Harness CPJ Macomber for sale

  24" 8 Harness Macomber CPJ Portable Loom for sale. Double back beams with friction brake and warp separator. 4 reeds, storage box, 2 ...